OK,
I started a few days ago…
This bike was originally my dad’s first mountain bike. He picked it up back in 1987. He got it right around the same time I bought my Panasonic Touring Deluxe. I remember him asking me if I was sure I wanted to buy a road bike.
“Are you sure you dont want to get a mountain bike?”
“Nah…there isnt anywhere to ride one,” I said.
Now, this bike has always been a hair big for him but it has always fit me nice. Back in 1991 or so I borrowed it for a road trip up to Vermont to watch the Norba races at Mount Snow. It was literally the second time in my life I’d ever ridden a mountain bike off-road. I remember pulling in to the parking lot and thinking what an amazing scene I was witnessing. My buddy Steve took his Stumpjumper off his roof and popped a wheelie and rode it for 20-30 yards. I thought, holy shit….this is all me.
Now, as you are all aware these early mountain bikes were all unsuspended. I remember looking at the Allsoft stems at a display and thinking that that was certainly a great idea. I remember walking up to the Dirt Rag booth and shaking hands with Maurice or maybe Karl. Just a few weeks earlier a buddy of mine who was with me on the trip had given me a copy to read. Black and white photos with a for real alternative edge…Hey! I’m in!
The chairlift up was amazing. I’d only been to Vermont one other time and it was for ski season. I remember looking at the rocky outcroppings on the hillside and I thought that this wasnt like the tiny western PA hills I was used to.
That first ride down the hill was intense. I just held on. Guys in brightly colored outfits wearing padding and riding brightly colored bikes flew past. These guys were getting in their practice runs. The hill was crowded and I was certain that before long I would cause someone to ride into a ditch and crash out. This first section was rutty double if not triple track. It was probably some kind of service road but I remember it was grassy.
At one point we turned in to the woods and made our way down the hill. Ahhh…I could handle this. It was technical but it wasnt so bad I couldnt make it down. After a bit we eventually made it down to the bottom. When I stopped I noticed how my handlebars were basically pointed downwards. I’d pushed on them so hard with my Kung-Fu grip that they were oriented like a set of drop bars.
I made it back to Pittsburgh in one piece and purchased my own bike shortly afterwards. The Schwinn was ridden by my dad exclusively for several years until he purchased a nice Trek 8000. The Schwinn ended up at their summer place and still saw quite a few miles. Last year he gave it to me.
And I plan on turning it into an urban assault fixie. It has always been a super smooth ride. I dont want to lose any of that. That is my objective.


9/24/2011
Some quick questions regarding the fixie conversion:
1) Will I be able to just purchase a set of track wheels and be done with it?
2) If I run a front brake how will that work with the larger wheel?
3) How in THE hell do I tear the bottom bracket apart? I dont think I have the proper tools for that.
4) Is there any set of steps I should follow to take off those rear brake bosses?
From Peatbog
The track hub will probably be narrower in the back than your original hub. You might have to make spacers. Or being that the frame is steel, you could bend it in a little until it fits. BUT, it might be that old Schwinn used a narrow rear hub to begin with.
Not sure about the front brake–you running 700cm wheels on that?
Not sure about the bottom bracket either. What’s that thing look like? Is there a ring you can spin off with a screwdriver and hammer (or the proper tool)?
Rear brake bosses look like a thin, cut-off grinding disk job–or a hack saw. Just get it close and then grind it closer and then file it perfect. If you cut too deep, it will look bad or you will have to use body filler or something. Basically, get it close with power tools and then hand tool it down to perfection. Nothing better than cutting into an old vintage bike frame that can’t be replaced (that was supposed to be a joke).
From Davkatreb
1-Yes and no. Buy all the track wheels you want. But that’s just for starters.
Key to a good running fixed is chainline. You will want that sucker dead on. Track hubs are typicall 42-45mm chainline. You may have a hard time getting the middle cog of a mountain triple to hit. Better would be a wheelset with fixed MTB hub. Or a disc hub. Het a bolt on disc, slap it on the disc side, put a single cog on the freewheel side. Done.
2-Depends on the brake. Nightmarish, I’d guess, with a v-brake. Not good at all with a standard canti.
No, what you want is a Paul Components Motolite v-brake. See, the arms are cylindrical and the shoes can be slid up or down to hit a wide variety of rims. 26, 24, 29, 700, 27-all fair game. Bonus-When slid out for biggetr wheels you can use short pull levers, so if you want to run drop bars you’re good.
3-Crank puller , spanner for non-drive side, spanner for fixed cup (I think). Been awhile since I’ve done an old fashioned cup and cone. Check the Park Tool site.
4-If it was me I’d:
a-ride a freewheel bike awhile
2-ride a fixed bike awhile
si-think about how cool it would be to perform bothacts on the same bike with the mere flip of a flop
not last-have a cold one
last-repeat as needed.
hopethishelps
Oh, two more things-
uno-you can indeed unscrew the freewheel, thread on a track cog and use a bottom bracket lockring to secure the mess. The Suzue on my Crosscheck and the Normandy highflange on my Raleigh are set up thus. So far, so good, knock wood. And the Redline hub on my Monocog ain’t even got a lockring. Buit if you get killed, don’t come cryin’ to me. I never said you should. Just said you could.
old maid-Read Sheldon’s articles on fixed gear, especiall on chainline. Don’t ride that sucker until you’re either sure you know the rules and have followed them, or a wrench you trust with your life has signed off on it.
Spoke
The cranks werent an issue, its the bottom bracket. I do have that Park crank extractor tool (very fun item to use…again…I agree with Sheldon Browns opinion on that one).
Also got the headset apart. I’m sure there is life left in it but there are most certainly some scoring marks on some of the races and hell a a 1″ threaded headset will run me $20 so that is coming off. Besides its kinda pitted. I cant justify doing all of this work and then cheaping out and leaving that old thing on there.
The bottom bracket on the non drive side has one of the 3 notched lockrings on it. I’m positive there is a specific tool for this procedure. I actually will probably take the frame as it is to the LBS and have them remove it. I might as well try and save it if at all possible but then again tehre is that pesky chainline thing. If I need to pick up an adjustment here that would also appear to be a common sense upgrade.
Speaking of chain lines I’m having a bugger of a time with the Diamond Back. The new FSA cranks went on great but that damn Q factor seems a bit off and it is clearly above my skill level to fix. I have to head to the LBS for that as well so I think I’m going to have them remove the BB from the Schwinn.
I have some old 27″ wheels that I stuck in there just to see the clearance and they were fine so the 700 variety would fit perfectly.
Oh and Cranky….you gots ta be patient with me. Sometimes I’m a little bit slow on the uptake and this is my first fixie. I can see myself right now asking the same question multiple times. Just sayin’
![]()
From Mr. Browns site:
If you’re using a “mountain” type frame, however, 42 mm chainline usually won’t work, because most mountain bikes have wider chain stays, so you generally can’t fit a reasonable sized chainring that close in. For that reason, singlespeed “mountain” bikes usually use a 52 mm chainline, or in some cases, 47 mm.
Now, I reinserted the old wheel that was on there and I look down from the top. I LOVE the idea of being able to use the old wheel but I now see the issue. Holy balls! I can see how this is going to be a working project for quite some time JUST TO GET IT CLOSE! OK, I have an old mountain bike. I’m trying to turn it into a fixie. I have a 52mm chainline dimension. So my initial idea of re-using the old bottom bracket (it looks fine…just super greasy and nasty) may go out the door because the spindle may be too long. But I have to actually buy a new crank to see whether or not the existing spindle will work. And all of this is predicated on the fact that I still need to get the cog threaded on to the old freewheel.
I wont even bring up the fact that I’ve had the shit spooked out of me because some of the catastrophic failures I’ve been reading about. And Cranky you even mentioned the idea of making sure I have a proper mechanic who I trust give this the once over before I get on the dang thing.
Fuck it…I should just make a damn singlespeed.![]()
Or I could just settle the fuck down and take a deep breath and convince myself that the committment one makes in riding a fixed gear bike comes in the initial task of building it. I kinda like that notion on further review.
Time to put everything down and go to bed.
Yes…but I could purchase a brand new fixie mtb wheel from Harris Cyclery for $75. I dont fuck with maintenance on wheels in any way, shape or form.
Right now I’m stuggling with the removal of the headset races on the frame. Everything else is off.
I know I need a new crankset. If I have to buy a new “old” spindle then so be it. Will an Origin8 165mm fixie crank suit my purposes? I was also looking at Sugino. I’m still on a farking budget with this thing. I hope to get it half way finished before the missus realizes what I’m doing.
![]()
10/1/2011
From Davkatreb
Spoke, for your application Harris sells a Origin8 crank, 110 mm BCD that gives you a 47 mm chainline with 107 mm spindle.Their “singlespeed/fixie” crank seems more for a track bike with 42 mm chainline.
From Spoke
Here is one I saw on fleabay. Now, if I swap out for the appropriate (whatever that may be) bottom bracket spindle does it matter which crank I buy? I didnt see on Sheldons site where he calls for a particular crankset that is usually compatible (Chainline wise) with most mtb frames.
For instance, the one below if used with a 103mm bottom bracket spindle would enable the bike to have a 43.55 chainline). If that spindle was taken up to 110mm would the chainline increase to the upper 40s or lower 50s? Am I cyphering this correctly?
![]()
BBS PART# 581-Red-165mm
- Includes – Track Cranks w/46Tx1/8″ chainring and 8mm fixing bolts
- Crank Material – Cold-Forged Alloy
- BCD – 130mm BCD
- BB Interface Type – JIS Square Taper (103 spindle recommended, chainline 43.5mm)
- Chainring – Alloy 46T
- Chainring Compatibility – 1/2 x 1/8″ inch chains
- Weight – 665gThese are a perfect choice for any single speed, track, or other type of fixed gear setup. The 46 tooth chainring provides a great pairing to virtually any fixed gear or single-speed setup you can come up with. The 3/32″ chainring is compatible with all 3/32″ and 1/8″ chains. These are made out of forged 6061-T6 aluminum for durability and light weight.
OK fellows, I have a few comments:
Before buying any parts, make sure you can get the bottom bracket and cups removed from frame. The drive side fixed cups can get frozen in place and be difficult to remove. I can remember using a cutoff wheel to cut one in half to get it out of the frame. I would recommended getting a sealed square taper BB… like a Shimano UNC-52, assuming you can get an appropriate length. The sealed units have displaced cones, cups and bearings for good reason.
I’ve must of missed it, but what is the plan for adjusting chain tension? With those dropouts, I don’t think moving the axle back and forth is an option. Obviously no eccentric BB, so that either leaves hoping for a good chain length (luck), or one of those 1/2 links or a eccentric hub? Eccentric hub = $$, Chain method is probably doable but a pain in the rear.
Why not run 26″ wheels?. At least then you can have front, rear or both brakes without any compatibility issues? Recall that there are cheap kits that include spacers and dingle speed thing-a-ma-jig to take care of chain tension.
Those chainrings say ‘Cycloid’ isn’t that some kindo of ellipitcal from? If you go single speed with dingle thing, you could still use them, otherwise, with a true fixed gear, you need round chainrings. To my eye, those chainrings show very little wear and have a lot of life in them.
My suggestion:
1. Use a freehub style 26″ rear wheel. Freewheel type hubs bend and brake way too many axles
2. use a single speed kit
3. Use a new sealed square taper BB, use the of the current cranks/ chainrings
4. use a new headset.
5. Buy new tires
6. Seatpost and seat would be nice 🙂
How much? Looks like $200 +/- if parts are bought new, less if used or parts can be scrounged up.
Install components and ride as single speed.
Chainline Measurement
Chainline is measured from the centerline of the frame to the center of the chain.
You can measure the front chainline directly with a simple ruler. Simply hold the ruler against the seat tube or down tube and measure the distance to the middle of the chainring teeth. In the case of triple chainwheel sets, measure to the middle chainring. In the case of doubles, measure to the halfway point between the two rings.

To measure rear chainline, the easiest way is to measure the distance from the inside of the rear fork end (or the outside of the axle locknut) to the middle of the sprocket.
Double this, subtract it from the over-lock-nut dimension of the hub (or the frame spacing , which should be the same), then divide the result in half, and you have the rear chainline.

This frame has a spacing of 125 mm
| Application | Dimension | Notes |
|---|---|---|
| Road Double | 43.5 | Shimano spec, measured to the midpoint between the rings. with typical 5 mm chainring spacing, this puts the inner at 41 mm, the outer at 46 mm. |
| Road Triple | 45 | Shimano spec, measured to the middle ring. |
| MTB Triple | 47.5-50 mm | Shimano spec, measured to the middle ring. 47.5 preferred, but for frames with oversized seat tubes, the longer dimension may be needed, because the fat tube places the derailer mechanism farther to the right. |
| Track/Coaster Brake Traditional One-Speed Most internal gear hubs |
40.5-42 mm | Older bikes with 110 spacing would be on the smaller end of this range Newer bikes with 120 mm spacing normally use 42 mm |
| Singlespeed MTB | 52 mm | Wider chainline need for chainstay clearance on MTBs.This is close to the chainline of the outer ring of a typical MTB triple |
| Rohloff Speedhub | 54 mm (58 mm w/13 tooth) |
|
| Singlespeed MTB Alternate |
47.5 mm | White Industries ENO hubs use this chainline, which lines up with the middle position of a typical MTB triple. It’s also fairly close to the outer position of a typical “road” double. |
Modifying the drop out should work. Did’t realize that was plan, or the otherside dropout was fully slotted. I would think 3/4″ of axle travel would be the minimum required.
The headset races should be able to be tapped out with a drift (maybe a piece of broom handle) inserted in the head tube.
I used an old handlebar to tap out the races.
Now…I need to get to work cleaning the frame of the grit, paint, stickers, etc.

10/9/2011
From Spoke
I tried repeatedly to shear them off from the inside but they wouldnt budge. I had to end up drilling them out. Probably made a hole in the one slightly larger than it needed to be but I can live with that.
I did manage to cut/grind off the downtube braze-ons with the Dremel as well as some of the work necessary to clean out the other drop-out.
But the most intriguing development of the project occurred on Friday afternoon when I stopped in at Kraynicks Bike Shop. Now, this place is the best in the city. And when it comes to putting together like I’m working on I really couldnt ask for much more.
I spoke to the owner and we discussed some options. He asked me if I was going to use the 26″ wheels or swap out to something else. He knows all about the make and model I’m dealing with. He said he has a tool in his shop that we could bend the frame with if I decided to switch to the 700 wheels. He said if I switch to the larger wheels then I would have to find a brake-set in his shop that would fit (and I;m sure I could).
He also mentioned that I could probably just reverse the existing spindle on the BB and use it. I could also more than likely use the existing crankset. I’d just have to take it apart and slap on an Origin 8 or something similar 44t middle ring and then just remove the granny and the big one.
The bottom line now is I need to get the frame prepped and ready. I’m taking my time with the Dremel. I want it to be right, but not necessarily fast.
Now…considering I am leaning heavy toward running a flip flop rear wheel set up with the ability to coast on the one side and fixed on the other…should I still stick with my original plan which was to take off the rear brake bosses? I really love the notion of having a “clean” bike and I really did want to avoid having that extra cable running down the top tube. I can deal with a front brake…but I really want to lose the rear brake.
I’m breaking my own code…Fashion before Function
From Peatbog
Personally, I like brakes, but I see your point on the styling of it. You should probably put it all together and then see how well you are able to brake with your legs before you grind off the cable mounts. Leg braking that rear wheel isn’t really as easy as it sounds.
If you keep the rear brake, you could also move the brake cable to the side of the top tube instead of the top. Or you could could make the brake cable a styling feature. Match the brake cable housing color to the seat and hand grip color. With the bare metal frame, it could look pretty good. Or you could drill holes and run the cable through the frame. Or, you could go crazy and run a coaster brake–how’s that grab ya!
From Davkatreb
For FUCK sake run a brake!!!! I’ve been hurtin’ bad for three weeks from running my old Raleigh Supercourse at 74 gear inches, brakeless. Tore the fuck out of my left quadracep. Little bit of strain on my lower back. And apparently all this caused bursitis in my left hip to make itself known.
For real, nevermind how good you can stop; you can do yourself some serious damage by resisting too hard.
From Spoke
That settles it. I’m grinding off both the front and rear bosses.
![]()
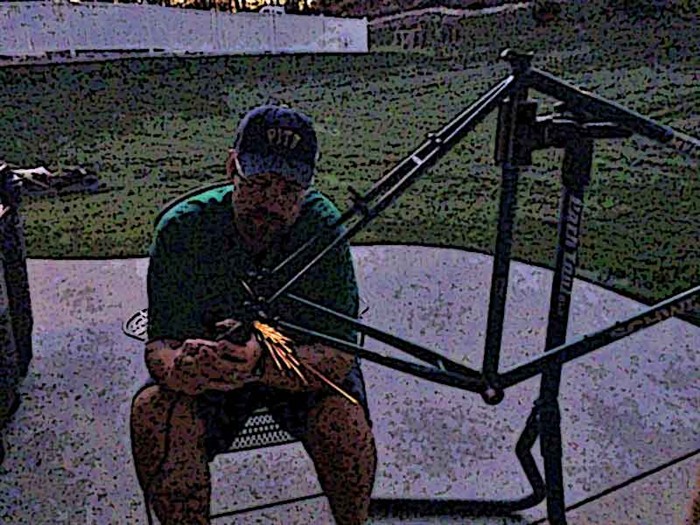
Seriously though…I felt pretty good after leaving Kraynicks last week. He also suggested I run a rear brake. But the entire set-up with possible questions and such could be easily addressed with stock he currently has in his shop.
So far I’ve probably spent a good solid 2 hours cutting and grinding. I’ve hesitated in removing the derailleur hanger but its coming off. I’m saving that for last. I dont have much experience working with my Dremel tool or any grinder for that matter.
Too bad I didnt have anyone take a pic of me when I was wearing my lacrosse helmet. It has a throat protector and I had these visions of something shearing off and flying in to my jugular vein.
“Local man bleeds to death as he works on his bike…”
And yes I am wearing clear safety glasses in the below pic


I know, I know…should be working on the bike instead of fuckin’ around with Photoshop

10/12/2011
From Peatbog
I could use a few pointers in using this crazy Photoshop thing:

From Spoke
Now THAT is funny!!!
Regarding the bike build I’ve been playing around a bit with the old BioPace cranks. The rings are off. The cranks are all polished up and the next step now is to pick up an Origin8 ring.
Hopefully by the end of the weekend I will have the cutting and grinding on the frame all finished up.
11/11/2011
So I’m progressing on the stripping of the paint from the frame…
And I took the frame today to Kraynicks to bend it just a bit…
I will be running 700 wheels on this urban assault beauty. When I looked into the idea of bending the frame I was a bit nervous. I looked up a few different articles on-line about cold setting. And I discussed it briefly with Jerry in his shop. He looked at me and said, “I have a tool for that.” It was only after this visit and conversation that I discovered that this process is typically done with a 2×4. I chuckled to myself about how he said he had a tool.
Well, when I got there today he escorted me to the rear of his shop and moved a few things and pointed out this functional piece of art. It was so smooth and fun to use that I wished I had 5 more frames to bend!
![]()
The backstory was this was a tool that his father used years ago to push the hard rubber tires onto pedal cars and in some cases old tricycles. He said it just came to him one night that with a minor bit of modification it would be a perfect tool to use to cold set a frame. He made the few tweaks and mounted it on a stand with wheels that enables him to roll it around his shop (It was funny to hear him describe how he could roll this thing around his shop because you cant even really WALK around his shop, but thats another story for another day). So now, if anyone ever decides to convert a mountain bike frame to accept road bike wheels they can just walk in and use this beautiful tool.
I think its funny how the auto Panarama setting on my camera got confused on all of the similar bits and parts hanging everywhere.
I’ve said it before and I’ll say it again…if you’ve never been to this shop you need to make arrangments to get there at least one time to experience it for yourself. No it isnt a shop that carries the latest and greatest MTB suspension wonderbikes…but if you are in the market to tear apart an old Peugot or are looking for some NOS Campy parts in an oddball size..this is the place to go.


11/24/2011
From Spoke
Pre painting…the plan is to get at least the primer down this weekend.
My Dremmel tool got quite the workout. I took off quite a bit of needless stuff.
I also briefly toyed with the idea of opting for a Brooks saddle but opted instead for a WTB Pure V. The clincher was seeing one with red accents. The bike is going to be black with just a bit of chrome/silver and red for good measure.


I must say I felt a bit like Dexter when I set up the plastic room in my garage.
I dont have a good feeling that this paint job will come out looking like anything but crap. Oh well..
$50 in primer/paint/sandpaper that I could have put toward a quality powdercoat.
Education = priceless
I have a silly question about the second picture. Is that race a part of the headset or is that a part of the fork? My 29r frame/fork came with a headset and the last time I had the Panasonic apart I dont remember if this was changed or not. Seems to me that that thing will need to be pried off of there and a new one installed which will be an element of the new headset. So…since I’m putting on a new headset anyway should I even bother masking that race?
Considering I’ve been a bike enthusiast for my entire adult life it never ceases to amaze me how little I really know about this wonderful machine.


12/17/2011
The pics are seriously backing up regarding the Ironspoke Bike Build. The latest update is the paint is on and I believe I’m done regarding that, but I may actually want to spray on one more coat because there are a few patches that look a bit hazy. They look like they may not have gotten hit as good as most of the rest of the bike. Before I clearcoat I want to be sure. Tomorrow I’m going to look at it one more time in the natural light.
I got the Ironspoke vinyl decals in the mail today so they can be applied just as soon as I determine I’m done with the paint.
I plan on buying the new headset by the end of this upcoming week. I’m going to run over to Kraynicks and pick up a shiny, silver, inexpensive one. I also need a can of frame saver.
I still need to purchase the wheelset and a pair of tubes. I have the tires already. I need a chain and the chain ring as well as the fixed cog in back. The front brakes will be purchased at Kraynicks also. I have the handlebars, seat post and saddle.
I screwed up the paint job on the stem but I’m not going to fix that just yet. I want to determine whether or not it will even get used. I’m still keeping my fingers crossed about the new and slightly funky Velo Orange bars. I took a bike ride today and dont think I had my hands off the bar ends more than 10% of the time.
Regarding my gearing I’m still up in the air on this. I know I can change it if I dont like it but I’m trying to get it dialed in as close as possible. Jerry told me to take out my Panasonic and ride it around a bit and decide on which gear I would be satisfied with if I had to pick just one. Now, I know that this bike will really never see any hills to speak of so that narrows it down quite a bit. That being said I still need to settle on this. When I was in there last he showed me the old, kinda beat looking conversion chart that looks like its been used for 30 years. He will take the gear I give him as in the number of teeth on the front ring and the number of teeth on the gear in back and convert it to a single gear or as close as possible to be an equivalent.
I’m hoping the bottom bracket will go in just like I discussed with him but he has many different spindle length options in his shop if the one I took out doesnt want to work regarding the chainline.
All of this gets done after I determine I’m done painting. And after I apply the vinyl decals and after I apply the clearcoat.
I really think I’m close to the homestretch. If I pick up any kind of free time at all over the holidays I may come close to getting it finished by early to mid January. Woohoo!!
I gots ta get the pics posted…
12/18/2011
From Davkatreb
If you’re going fixed, anywhere between high sixties and mid seventies should be fine. The formula is:
chainring / cog x tire diameter
For example, a 39 tooth chainring, 16 tooth cog and 26 inch wheel yields 63 gear inches; perfect for cross country.
If you are primarily riding flattish ground, low seventies will serve you well. Did I hear you say you are running 700c/27 inch wheels? Try 42:16 for 72 gear inches. That should be spot-on.
From Spoke
Of course the key will be whether or not the paint actually stays on the frame. Like I mentioned previously the last time I tried this the stuff peeled off like an onion skin.
The red may seem a bit out of place but I think once its all together you will see the look I was trying to achieve. Everything will be either silver/chrome, red or black.
The vinyl stickers will/should go on tomorrow. I ordered two stickers of two different stickers to go on two different tubes. Unfortunately both stickers were ordered just a bit too large. For $22, however, I’ll make them work.


11/24/2011
Merry Christmas!
I installed the headset yesterday at Kraynicks. More details in a bit…


I only do repairs/maintenance at Kraynicks when I cant do them at home. Usually this involves some special tool that a bike shop would own but that your basic home mechanic would not. Yesterday I got to use the headset press tool from Park. What a fine piece of equipment.
The guy next to me was working on his own bike and we chatted a bit about this and that but he was a huge help when it came to asking some pointers. Now, I dont play around with wheels. You will never see me attempting to true a wheel. But everything else? Sure, I’m game.
I’ve never installed a headset before but I did take one apart. How hard could it be? Well, as it turns out it wasnt a terribly difficult procedure (again it helps to have the right tools) with the only exception being the diagram included with the Tange headset showed the bearings being oriented in the wrong manner. It just didnt seem right the way they showed it. I was relieved when the guy standing next to me offered his advice regarding the headset. Turns out he had the exact same issue when he installed the exact same headset previously.
In addition to the headset I also picked up the new wheels. The one thing I noticed however was that I still need to grind out just a bit more on the rear drop. The axle didnt want to slide in. That should get handled today.
I’m getting close….
![]()
1/1/2012
Happy New Year!
Lets see…bottom bracket, crank, chain-ring, cogs, bar tape, front brake, pedals, binder bolt…and I also have to epoxy the Schwinn headbadge to the frame.
Still…the finished product is in sight.
![]()

From Peatbog
That is cool! I like the way the red shows up in the tires, seat, decals and frame. The way you did the back part of the frame with the silver over the wheel and the red over the tires is pretty cool too.
From Spoke
If you are primarily riding flattish ground, low seventies will serve you well. Did I hear you say you are running 700c/27 inch wheels? Try 42:16 for 72 gear inches. That should be spot-on.
Now, you made the above suggestion regarding the gearing just a bit ago. That sounds about right from everything I’ve read but the problem is Jerry at Kraynicks is expecting me to walk in armed with the information he wanted me to provide. He gave me instructions to ride my Panasonic and spend some time really trying to figure out what gear is best if I had to choose one. Then he would take that information, plug it into to the conversion chart or maybe pull out the slide rule and Viola ~~ I’d be set with the perfect fixie gear.
The problem is I did spend quite a bit of time tooling around my neighborhood figuring out which gear felt best but the information I wrote down got lost in my personal, mini black-hole. It may sound hokey but I feel if I walked in and told him I want this in the front and that in the rear then he is just going to look at me and give me that look like “I told that knucklehead what he needed to do…why dont these kids ever listen to what I tell them?”
When it comes to bikes, and when it comes to this kind of project, he is really in his element. Chances are strong I will come to the exact same gear ratio you suggested…I just want to get there via his method. It probably sounds like I’m making this way more complicated than it should be but I have to tell you…when he looked at the results of my head set installation and said something to the effect of “Yeah…thats a good job,” I really felt like I took a serious step in my mediocre wrenching skills.
I’m in a hurry to finish this thing but I’m also not in a hurry if that makes any sense. Besides, this is one of the last things I need to do. It is almost finished.
Regarding pedals I figured I’d just throw on some old Sun Tour mtb pedals I have gathering dust. I’m sure when things settle down with the bike I’ll figure out what feels best. Again, this bike will see 3 different rides. I will take it to the track. I will take it to the Yough River Trail and I will take it to Pittsburgh for some urban assault riding. No hills to speak of.
From Spoke
I must say that I was a bit disappointed on the paint job after I clearcoated it. The black turned out OK but the chrome paint really seemed to loose its luster. Now, after the wheels are on I’m happy again. The Alex rims and the hubs and spokes have kind of a brushed look to them and they actually match better more than if the paint had retained that original luster.
I know they sell the red fixie chains. I’m not sure about the chain ring. Kraynicks has a million different options regarding that. Again, it will either be black, silver or red. I will be running a front brake so I assume the cable and hood will be black and I assume the brake (lever and caliper) I pick up at his shop will be silver. I’ve seen a couple of different red/black bar tape options, but that will be the last thing. The verdict is still out as to whether or not I will be able to re-use the old stem. I painted it black and I’d like to keep it but I will have to see about reach, height, etc. as far as that new Trekking bar is concerned. I saw a bike outfitted with the exact same bars down at my local REI store and it looked and felt fantastic. I didnt ride the bike but I straddled it and all was good.
1/6/2012
I’m using my original cranks (hopefully) and BB (hopefully). The crankset was originally built up with BioPace rings. Those have been cleaned up and will be sitting on one of my bookshelves when I get a second.
There are multiple options at my disposal at Kraynicks so I will be sticking with what he has in stock, unless for some reason he doesnt have a red chain. Like I probably have mentioned, however, this shop is a haven for urban fixie fanatics. You cant stop in at the shop and not see some hipster working on a rattle can project at one of the stations.
I have made a decision about the gearing, though. I am going to just start with a 42/16 combo and then go from there. Thinking I can dial this in right off the bat is foolhardy.
The question I have is what kind of singlespeed cog should go on the other side of the flip flop hub. Again, this bike wont really see any hills to speak of.
And regarding the color schemes…I actually thought that a red chain ring would be too much. I was thinking of going with silver and then using a red chain.
Where is that computer program where you can click on parts and then see a virtual rendering of your bike? I used to love to go to Speedgoats page and build up virtual bikes. You could see the price and try and visualize how things would work together but you could never “see” anything.
1/15/2012
OK,
So here is where I am at this point. It wasnt until I really put this thing together that I really understood how some of the clearances work. I played around a bit with this bottom bracket assembly today and I believe I have it …close. I’m not exactly convinced that ths chainline is as spot on as it needs to be.
I’m not buying a new crank just yet. I want to try and use my existing crank wth a new ring.
The fixed cog goes on inner threads and then the lockring goes on the outside, right? Again…I’ve looked at Mr Browns page quite a bit but some of these specific questions seem to get glossed right over.
If this chainline isnt where it needs to be then I believe I could always opt for a different bottom bracket spindle. I have a few MM I can pick up there and then everything would see just right.
I do think that a new crank will be in order some day.


I’m running a flip flop hub. Doesnt redishing mean the profile of one side of the wheel is changed? The other side will still be out.
In a nonrelated screw up I accidently left the fixed side race of the bottom bracket soaking in vinegar and I tore the finish off. Now, instead of just a minor bit of suface rust the cranks sound like there are specs of dust/dirt in there. So…my screw up is actually going to end up forcing me to buy a new bottom bracket. I can shorten the spindle just a bit.
The list of parts needed for me to finish include:
Seat binder bolt
Front brake (lever and caliper)
Bar tape
Single speed freewheel (18…right?)
Fixed cog (16) and lockring
Chain
Bottom bracket (maybe just a fixed side race and shorter spindle)
Chain ring (46)
And possibly stack bolts to help me dial in the chainline…
1/21/12
From Davkatreb
Yeah, a flipflop will make it abit tougher if you plan non running both sides.
Track hub+MTB crank=chainline issues for sure. Remember, there’s no law against running your chainring on the inside of the spider. If it’s still too far out, afew washers and some longer chainring bolts might help line things up. In any case, I’d rethink the gearing. 46:16 with 700 wheels will yield about 75 gear inches, which starts to sniffing around track bike ratios. If you are at all considering any sort of real world applications, you and your knees would both be happier with mid sixties to low seventies. That will get you up a hill without grenading your knees, and will bring you down the other side without spinning too frantically. Remember, it’s a fixed gear. “Make haste slowly” should be your mantra.
Remember, though-even if you have a flipflop hub, good chainline is worth more than the ability to run two cogs. Hey, I just got a thought-If you can get the chainline right for both sides, why not a Surly dingle cog? That way you’ve got a good cruising ratio, and the 22 will get you up some serious hills when you need it. Been thinking of soing that very thing if I ever replace the 20 on my Suzue.
So is your hub fixed/free or fixed/fixed?
From Spoke
Well, I did it…I took my first spin on the fixie! Now, granted it wasnt a proper spin but considering it still doesnt have a front brake and considering it is very dark in my street below the driveway I’m pretty pleased. What a crazy feel regarding the slowing of the cadence. I mean I only rode around in circles a bit but I can after this 4 minute ride totally see the importance of running a front brake.
I had the bike at a Bike Line yesterday and one of the techs came out and gave it the 30 second glance but he said immediately that the chainline was fine. And today I had it briefly in Kraynicks, just long enough to pick up a front brake, a cable and a brake lever. He also gave it the one over and said it was nearly perfect which was good enough for me. Woohoo! Now I just need to get everything taken back apart and locktighted back on. Then, the brakes need put on although because of the curve of the handlebar I may have to pick up a differnt lever (purely for aesthetic reasons…I dont like how the lever sticks out at an angle how I have it oriented. I think a smaller lever would be better). I need to pick up a bolt for the seatpost because the quick release that was on there is just too big and clunky looking. Besides its bent.
I’m still not happy with how I cant seem to pull the rear wheel back in to the drops tight enough. I’m thinking its getting caught up on the paint. The guy at Bike Line showed me a trick regarding how to use the weight of the bike to pull it as far back in the drops as it will go. There is room, it just doesnt want to slide back there for some reason.
I am really gettin close. The front brake mounted a bit strange on the front fork. I have a lot of bolt sticking out the back. I feel compelled to cut this off.
![]()
And the red and black bar tape was ordered yesterday. I believe I should have a reflector or two on there for safety purposes. I picked up a tail light yesterday but it seems too clunky for this build. I’ll use it on another bike.


The initial gearing is 46/16. I needed to have a baseline. I’ll adjust accordingly.
I havent posted any final pics because of tire issues and final brake and tape installation. One thing always ties in to the other. It seems like I’m constantly having to run to the bike shop for this or that.
These tires have been a real pain in the ass. First off, I had a blow out on the front tire at the stem. It was faulty. So I go to reinstall with a new tube and then it blows out. I patched the hole and then it blew out at a second spot. Mind you this was all while the bike is on the stand. So that tube gets thrown in the garbage.
On the rear tire I’ve always noticed a bit of wobble and after a closer examination I can see how the tire is slightly out of skew. WTF? The last thing I need to happen is a blow out when I’m simply pedaling around a track. So that tire needed replaced.
The whole time I kept having these thoughts in my head regarding the minimum tire width for the Alex rim I have. According to Mr. Sheldons chart based on the inner width of the rim the minimum sized tire I should be running is 25c. Well I didnt buy 25c tires…I had 23c tires. But one of them is warped. So do I chuck both of them and move up in size? But I’m trying to match the damn color. But you should never let fashion dictate anything when it comes to being safe on a bicycle. BUT I PAINTED THE DAMN FRAME A SPECIFIC COLOR OF RED BASED ON THESE TIRES. But then I couldnt find 25c tires in that color. So after much deliberation I spoke with a local shop and he had the red color in the 25c size. I bought them last week. What a fucking waste of my time but then again thats what you get for NOT going off the rack and for trying to be aware of how something looks as well as how something performs.
Very long story short…I have the tape put on (it looks very nice if I do say so) and the front brake is installed (I’m not partial to non canti or disc brakes) to the best of my ability. The Velo Orange lever looks sweet also. The new 25c tires will be installed as soon as I pick up another tube (damn these skinny tires are a serious pain in the ass).
Getting back to the tire issue I know that 23c tires are kind of an industry standard and we are talking about very minor clearances here, but these tires seem to slip on to the rims a bit too easy for my liking. I have reinstalled the one tire with the good tube and it did seem to take quite a bit more effort so I think that is a good thing.
The last thing I plan on doing is taking it to one of the shops by me (I havent figured out which one just yet) and paying to have it looked at and given the once over. I’ve put this thing together with the best of my ability and along the way I have been given nods of approval from pro wrenches regarding chain line and the headset installation, but I would just feel better if I knew someone had looked at the whole package. I dont want to wind up as some anecdote of the guy who built his own fixie and then had a catastrophic failure. I’ve been warned numerous times regarding making sure certain parts are really battened down and having this thing blow up on me after a few spins around the track would not be a good thing.
I’ll post the final pics probably within the week…
![]()
I took my first proper fixie ride today (around the flat grounds of a VA hospital) after work and all I can say is I now understand what people are talking about when they say they are somehow better connected to the bike when they are riding a fixie compared to a geared bike. Dont get me wrong…I’ll never give up my gears. Besides with the hills around my house they are an absolute necessity. But for specific rides in specific well suited places…I’m in!
The one thing I still need to do is get the bike to a shop to adjust the brake. Right now its on there but not really functioning as it should. After 5 pm the hospital clears out and there are huge parking areas and smooth walkways and tons of virtually car free roads.
![]()
I took a nice little introductory ride yesterday and I went for a little over an hour today before I ran out of light. Today I only used the front brake a single time. I still need to get it dialed in by a proper mechanic.
I really enjoyed myself today. Empty parking lots and virutally car free roads where the maximum speed is only 25 miles in the first place is a perfect place to ride this thing.
One thing I do notice is that I miss the ability to stretch out my legs periodically but what I’ve now started doing is simply removing both feet from the pedals, stretching out a bit and then getting them back on.
I love the bars! I do know that I’m not 100% sold on the stem dimensions. Remember, this was a mountain bike with mid 1980s era riser bars in its first incarnation. I believe I want to stretch out a bit more than the current set-up currently allows. I dont exactly feel cramped but it seems like its about an inch or two off. I also managed to bang my knees once or twice when I was standing and pumping today but that could be just from me not being as smooth as I should.
I also find myself accelerating through turns which is awesome.
Overall…considering the limited time I have on it…I love it!
I guess its about time to finish off this thread but I wanted to just say that I have been having a blast on this bicycle. From the time when I first climbed on, forgot I couldnt coast and nearly catapulted myself over the bars, to today where I’m gaining confidence in my ability to take it anywhere. My problem is I need to remember I cant take it over certain obstacles or I’ll be changing tires all the time.
The one thing I still need to do is get to a pro wrench to adjust that front brake. And the seat needs lowered just a bit. I’m actually settling in to the stem dimensions and I may end up keeping it as is.
I’m also happy with the gearing. I know I will eventually change it up a bit to see how other set ups will ride. And I do need to pick up the freewheel for the other side.

